

 "
"I don’t think I’ve spent so much time at home in… well, ever. Our family is usually pretty active, with a to-do list a mile long, but the pandemic shifted the way we live and play. In a way, it’s been refreshing to be isolated at home and have the opportunity to invest in our living spaces. That weird flicker in the entry ceiling lights? Well, it now bothers us enough to actually grab a ladder and replace that bulb. The yellowing linoleum in our daughter’s bathroom? We spent a couple of hours with some chalkboard paint for a quick makeover that brightens the whole space.

And then there are the larger projects that we’ve been putting off. With the money we’re saving by not going out to eat or traveling as much, we’ve chosen to reinvest in our home. Our kitchen, in particular, got a facelift that brought out its beauty and functionality even more. And we weren’t alone in our home renovation projects!
I talked with some of our editors about their favorite home improvements from the last year. Despite the turmoil of pandemic life, our team has felt lucky to have the resources and opportunity to make changes that create the most impact in our respective homes. Below, our editors talk about their top home improvement projects, from kitchens and basements to gorgeous statement walls and decor refreshes.

Kitchen Renovation:


When we moved into our home, it had metallic silver bannisters and black walls. No shame on silver bannisters—they were actually pretty striking. But we wanted something a little more soothing and neutral that could give us a sense of sanctuary in our busy lives. As a food-obsessed human, the kitchen was a priority for us, but it took a while to save up for a large renovation. That meant we lived with the current kitchen for a couple of years, which gave us insight into what an ideal design really meant for our family.
We brainstormed with our contractor to come up with a plan that felt timeless and functional, but still had some personality.
Luckily, all this happened right before the pandemic, so we didn’t have to worry about social distancing from the workers. We brainstormed with our contractor to come up with a plan that felt timeless and functional but still had some personality. I’m most excited by the herringbone backsplash, brass fixtures, and farmhouse sink. Those details give me such joy every day, but nothing is so precious that we can’t use the kitchen to its full potential. From messy baking adventures to elaborate and ill-advised meals, we’ve settled into our kitchen with a lot of joy and excitement for more memories to come.
My tips for a kitchen renovation:
- Find a contractor you connect with. Ask the right questions, research their credentials, and really focus on how they communicate with you and their team.
- If possible, live in your space for a bit before you undergo a renovation. Take notes about what you like and what you wish were different.
- Hone in on your style well in advance of the renovation. Do you love trends? Are you more of a traditionalist? Go to stores and look through the options, even the ones that you may not have thought about.
- Have so much patience. Delays are inevitable, so have a plan for how you’ll survive without your kitchen for an indefinite amount of time. Know it’ll be worth it in the end!

Statement Walls and Creative Storage:

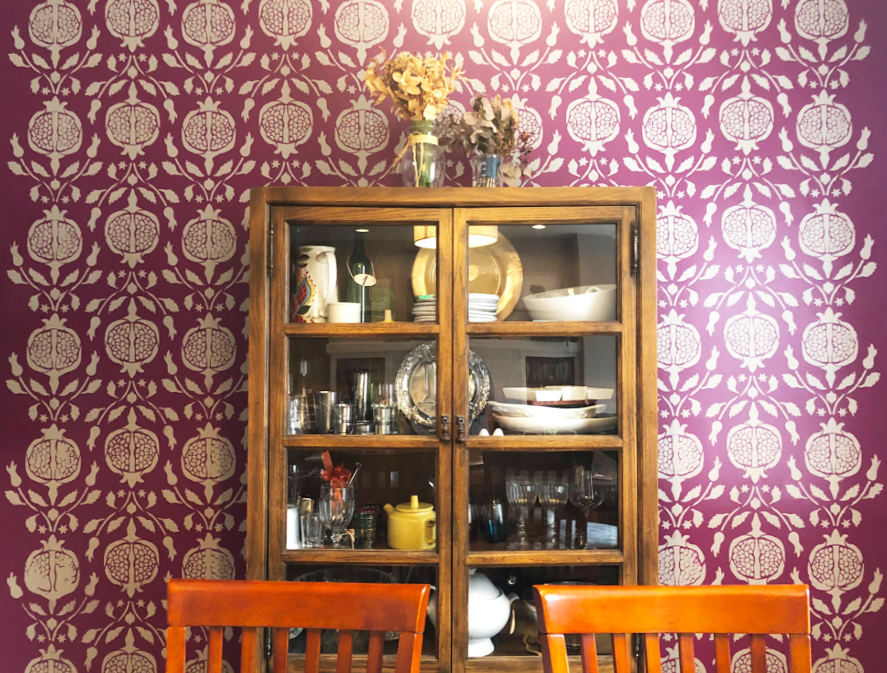
When we bought our place (in the middle of a pandemic!), we knew we needed to do some things to make it more functional for us. After spending so much money purchasing the home, we wanted to wait for any huge projects. My husband is a huge advocate for DIY so we decided to start simply, within his (and my) wheelhouse. The previous owners had painted a beautiful gray through the entire condo, so we wanted to put in some statement walls, to give the rooms our personal touch. In doing my research, I stumbled onto the use of stencils and fell in love. It gave a wallpaper vibe without having to learn how to wallpaper and spoke to my intense love of patterns.

We also needed more kitchen storage and weren’t ready to commit to anything so major as a bunch of new cabinets. I’ve always liked the look of hanging pots and pans, but there didn’t seem to be a good spot for that in our setup. I’m particular about where they hang because I don’t want them near my stove since I’d be constantly cleaning them then. We decided to make one of our walls in the kitchen a statement wall, similar to the other rooms. Except, instead of a stencil, we landed on our hanging racks.
I loved Julia Child’s pegboard, but my husband was against that, so we decided to do rows of wood as the backing instead. I scoured Etsy and found some cool hooks that are made out of copper, so I knew they would be strong enough to hang my cast irons from, and we grabbed pre-packaged stained wood from Home Depot. This was a one hour project on a Saturday morning and a huge change for the room. I’ve been thrilled with the outcome. I love things that are both functional and beautiful.
My tips for painting and DIYing:
- It’s worth the extra step to sand. My husband is super handy and brought up sanding to prep the walls before painting. As much as my inner efficiency angel sighed deeply, after going through the extra 20 minutes of effort, the actual painting went so smoothly. The walls took the paint easily and required less coverage. It helped us keep our budget down by letting us buy smaller gallons of paint, and you’d be surprised how much paint can end up costing.
- Stencils will get paint everywhere. I imagined this part to be like a glamorous movie montage with perfect stencils, and it just… wasn’t. Once you start painting, the stencil is now covered in paint. I know, mind-boggling, yet it never occurred to me. You have to move it carefully, move all furniture out of the way, make sure you have paint to do touch-ups on the other walls and put tarps everywhere you can.
- Be thoughtful about what you like and dislike. In having to decorate our first home together, my husband and I struggled at first because we didn’t absolutely adore each other’s taste. It was hard to find stencils we both liked, for example. When we finally got clear about what we liked (patterns that create lines, and organic shapes), it made it that much easier to hone in on something we both adored.

Playroom Turned Home Office:

Like Thao, we lived in our home for years before tackling a big renovation project and were lucky to finish our kitchen update just before everything shut down. So with a big project newly completed, I spent some time focusing on smaller areas of our house during this extended time at home.
Our most recent update was converting our sunroom/kids’ playroom to a home office. The room gets great natural light; has closable French doors; and originally housed a play kitchen, mini-trampoline, craft table, and baskets upon baskets of toys. It was almost always a mess, but it was a special space where my girls first “played” together, my youngest on her playmat, my oldest patting the head of her new baby sister.
Once I no longer needed a mini-trampoline on my main floor to get out preschooler energy, one of my favorite spaces in our house became the dog’s room with a rarely used pull-out couch and rarely played piano.
But as my kids outgrew their bigger toys (i.e. the play kitchen), we moved some of their things to the basement, their bedrooms, or the donation pile. Once I no longer needed a mini-trampoline on my main floor to get out preschooler energy, one of my favorite spaces in our house became the new dog’s room with a rarely used pull-out couch and rarely played piano. So on a recent Saturday this January, my husband and I decided to convert the room into a home office.

The pull-out couch went up on Facebook Marketplace priced to sell (and it did that day). We purchased a desk at Costco and set it up with surprisingly little conflict. I found a rug at World Market and moved a West Elm light fixture from another room to finally replace the one I hated since we moved in. And I’m writing this very paragraph from our new office chair.
My tips for evolving your space to fit your family’s needs:
- Audit How Your Family Uses the Space. This was a lesson I learned through our kitchen project too. Before we remodeled, our formal dining room was used a handful of times each year for actual eating or entertaining. The rest of the time, the table collected dust, accumulated unopened mail, and acted as shipping and receiving from Amazon. Before we tackled our home office project, we realized we’d closed off the room for months because our new puppy kept using it for a bathroom. Now with our puppy house-trained, my kids in school, and my husband and I spending endless amounts of time at home, we needed an office space beyond the kitchen counter.
- You Don’t Need to Save All the Things to Have All the Memories. My mom recently moved in around the block from us. It’s amazing to have her so close, but it’s also alarming how many things she’s saved since I was a kid. Her basement is a kid-zone complete with Super Nintendo, dozens of LEGO sets, the original Toy Story Buzz and Woody, and more. Is it fun to visit? Absolutely. Was it hard to give away the play kitchen I spent four hours assembling? A little. But do I want to store it unused in my basement for 30-some years? No.
- An Evolving Space Can Be an Evolving Project. My final step for this room is to paint it a moody hue to contrast the mostly gray and white walls in the rest of my house. As Shea McGee wrote in a recent Instagram post, “Small spaces are sometimes the best places to push boundaries.” My husband was ready to do it all in one weekend, but I gently reminded him what happened when we previously rushed a paint job—he ended up painting our new baby’s nursery twice. So I’m going to take my time choosing a wall color, considering window treatments, and outfitting the extra office touches. Some day, I envision adding doors that lead outside to our patio, but for now, it’s just what we need.

Major DIY Bedroom Remodel:
I’m not the type to believe in love at first sight, but when I first laid eyes on this funny, old house, I understood what all the fuss was about. I walked through its rooms rapt by its quiet, threadbare beauty: round rooms, ceiling beams, leaded glass, and heavy oak pocket doors. Everywhere I looked there was a little delight—and as my husband and I would learn—the exact opposite. Since buying this late 1800s home five years ago, we’ve lived in a near-constant state of renovation, taking a jackhammer to ‘90s floor tile, crowbars to unsalvageable plaster, and hand scrapers to layers of painted trim. But of all the work we have done thus far, the biggest impact has been what we did in our bedroom this year.

Once a grossly oversized and ugly space, our room was full of bulging, gaping plaster and broken windows. Adding to its charm, someone over the years had stepped through the attic floor, leaving an undeniable footprint in the ceiling. No one could blame us for closing the door and staying away.
But the day my husband suited up in his respirator and disappeared behind layers of plastic sheeting was the start of something good. He pulled the walls down to the studs, built a custom closet, split the room in two (his art studio now hides behind French doors), and hung the wallpaper of my dreams. And while it is a far cry from “finished,” when you love an old house, that word is never truly part of your vocabulary anyway.


My tips for DIY house rehab:
- Be realistic. This route is painful, sometimes even physically. It is also painstakingly slow, so it pays to get used to discomfort and the sight of raw drywall.
- Get expert advice. if you’re tearing into plaster, pulling up tiles, or stripping pre-1980s paint, test for asbestos and lead—especially if you’re living with young kids. These dangers don’t come up in your home inspection, so it’s crucial to bring in another pro.
- Invest in your gear. At the very least, buy a good shop vac and a respirator mask. Oh, and lots and lots of Tylenol.
- Live your life. I’ll admit that sometimes it’s hard to relax when I am fixated on a piece of missing window trim. There have been stretches where our weekends were consumed, not by family time, but by hard labor. No fun. Find a balance between progressing on your projects and kicking back to actually enjoy the results.

Small Decor Updates for Big Impact:
When my husband and I moved into our three-bedroom condo in downtown Chicago in summer 2019, we took on a lot of big renovation projects right away—like refinishing our floors, painting, and updating our kitchen—and decided to tackle many of the smaller, “would be nice” projects down the line. Fast forward a few months, enter a global pandemic, and add a ton more time spent at home, and we were finally ready to take on a few “projects” that seemed manageable and now worth the money more than ever.

The first was sprucing up our small third bedroom and turning it into a simple yet enjoyable work from home area. We already had a desk, chair, lamp, filing cabinet, and printer, but if I was now going to work from this little, window-less space full-time, it needed some love. Once stores reopened, we made a safe trip to our local HomeGoods and grabbed a plush rug, a large piece of art for above the desk, and a few office accessories to make the room feel more finished. For under $150, we were able to add a lot of personality to this space!

The next project we tackled was adding a much-needed light fixture over our dining table. Both because we literally needed more light (who likes eating dinner in the dark?!) and because, due to our loft-style condo’s very high ceilings and open-concept spaces, we wanted something to help better define this area between our kitchen and living room. We’d previously picked out this budget-friendly pendant light but took months to order it and subsequently schedule an electrician to install it. After all that, I’m here to tell you: don’t wait! Adding this fixture completely upgraded our space and made our open-concept living area feel so much more cozy and lived-in.

Our final home improvement project was to figure out what to do with a big blank wall in our entryway. We toyed with the idea of adding a pretty console table and some art but needed something more functional as it’s where we put on our shoes and throw our bags, winter gear, etc., as we walk in the door. During another masked trip to HomeGoods, we found a cute-looking storage bench, and I pulled some old throw pillows out of our guest room to place on top. Instead of buying art, we decided to frame a few iPhone photos from our favorite places to add a personal touch to the decor. These $20 matted frames from Target plus a prints pick-up from Walgreens finished off this space!

Basement Upgrade:
We made a number of changes and updates to our home before we moved in, but one project that we kept on the backburner for later was doing anything of significance to the basement. Pretty quickly, we realized how nice it would be to have extra usable space in the basement for the kids to play and for bigger toys that didn’t make sense in the playroom upstairs. Even though our kids seem to think they run the place, seeing as it’s our house too, we wanted to make sure toys could be easily put away, and the space could feel grown-up when needed.
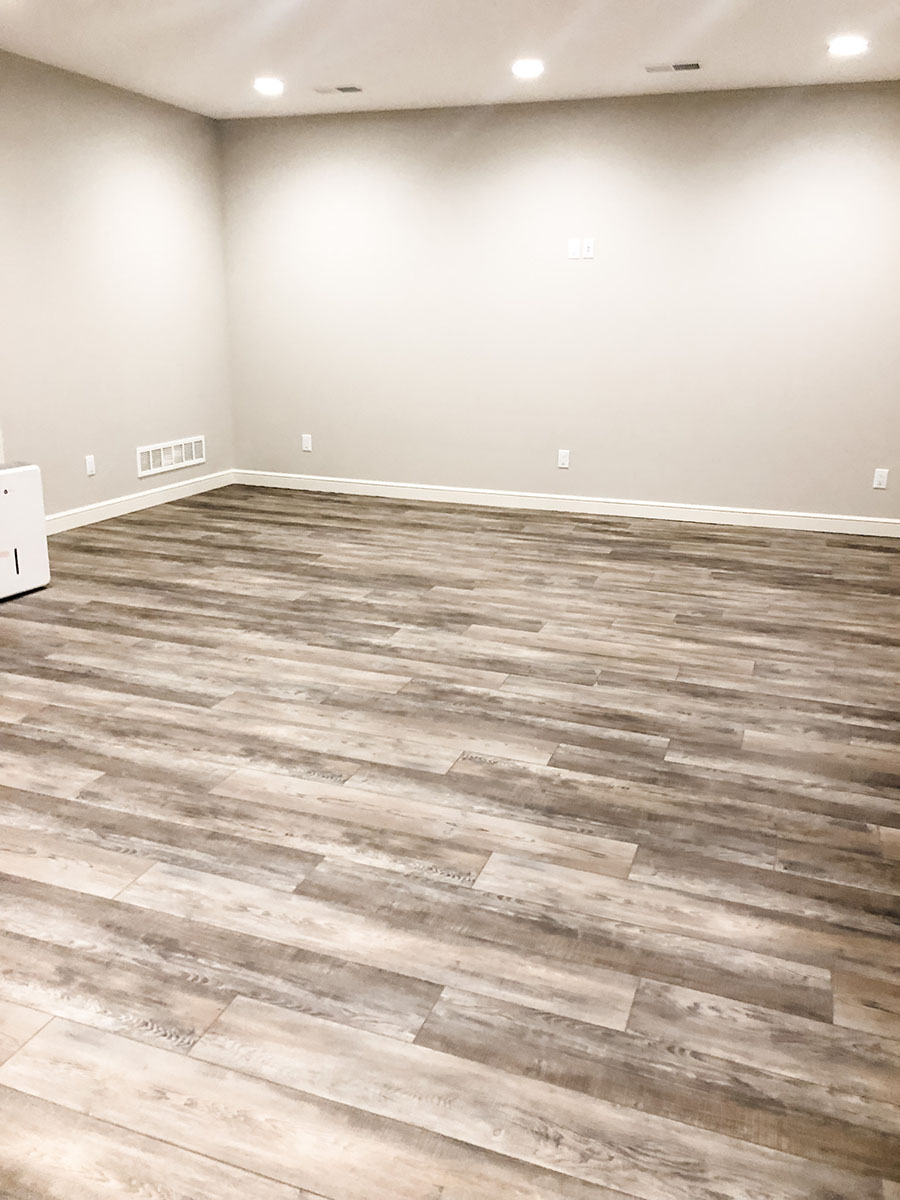
My husband was completely against putting carpet in the basement, as big rainstorms can lead to water getting down there. To cover the previously paint-splatter-stained concrete floors, we opted for a type of flooring called luxury vinyl tile. Luxury vinyl tile is made to be not just water-resistant, but waterproof. This means it could sustain wet conditions for longer periods of time without damage if, say, a huge rainstorm brought water into the basement when we were out of town. This type of flooring is also friendly to things like lots of foot traffic, crawling kids, pets, spills, and drops… basically, the perfect flooring for a basement for us. It turned out beautifully and made the formerly cold, stark basement welcoming and cozy.

The next thing we did was hire someone to build a built-in bar across one of the back walls in the basement. We designed it ourselves based off a bar at one of our favorite restaurants, just on a smaller scale. And as for the bottom–we asked the builder to incorporate cabinets where we could easily stash kids’ toys and other things if we were having company over. After the contractor built the bar, we stained it ourselves, and I have to say, we love how it turned out. We still have one small project on it — to put a tile backsplash in part of the back, which we’re doing here soon.

My tips for basement updates:
- Keep functionality in mind. I would have loved to have a carpeted basement for the sheer coziness and warmth that it brings, especially when we spend more time down there in the winter months. But it just didn’t make sense from a functional or practical perspective. Finding an alternative that’s just as beautiful and cozy–but can sustain things like kid spills and (heaven forbid) marker going off the coloring book pages, is a decision I know we’ll be happy within the long-term.
- Get as many samples as you need. Whether it’s paint colors, stain finishes or flooring styles–bring home as many samples as you need to see to make your decision. Things often look different in your home than in a store.
- Take it one step at a time. Our basement is still a mishmash of old furniture that I don’t totally love. Eventually, I want to design the space to be the beautiful idea I have in my mind, but for now, a few small changes have made a huge difference.
Read More: The Experts Have Spoken: These Home Trends Will Dominate 2021